Tuesday, September 10, 2013

Thin Mints

I just got my hands on The Ultimate Gluten-Free Cookie Book  By Roben Ryberg, and I'll have to say that at first I was more than skeptical about her single flour philosophy in gluten free baking.  All of the cook books I have use for gluten free baking require several flours, mixed to achieve the desired consistency to effectively mimic wheat flour, but not Ms. Ryberg.  She says that instead of trying to create a wheat flour replacement, look to the qualities of the flour you are using and accentuate them.  Intrigued I was.  Although I must confess I didn't think it would work.

Ingredients

1/3 Cup Canola oil
1/4 Cup sugar
1 Cup brown rice flour
1/3 Cup unsweetened cocoa powder
1 Egg
1/8 tsp. baking soda
1/2 tsp. salt
1 tsp xanthan gum
1 tsp vanilla extract

Chocolate coating
12 chocolate (I used enjoy life chips)
2 Tbs. powdered sugar
1/2 tsp mint extract

Preheat the oven to 350 degrees F.  Line 2 cookie sheets with parchment paper.
In the bowl of your electric mixer, combine oil and sugar, beat well.  Add the brown rice flour and and beat well.  Scrape down the sides of the mixing bowl at least once during mixing.  Add the remaining batter ingredients and beat well.  Continue beating until the dough comes together, it will be soft and oily to the touch.

Roll out the dough to 1/8 inch thickness.  Use 1 1/2 inch round cookie cutter to cut the cookies and place them on the prepared pan.  Bake the cookies for 8 to 9 minutes, until the tops are dry.  Let cool well before coating: the cookies will be crisp upon cooling.


In the book she uses the microwave for making the coating.  But I prefer the results of a double boiler.  Combine all ingredients for the coating in the double boiler, and set your burner on medium.  While the chocolate melts, prepare your cooled cookie sheets with wax paper.  When all the chocolate has melted, and when mixed is smooth and silky, you are ready for coating!  I used tongs to dip the cookies into the chocolate, then a butter knife to remove the excess before resting the dipped cookie on the wax paper.  After all the coating was done, I put the in the refrigerator to harden.  

Recipe adapted from The Ultimate Gluten-free Cookie Book by Roben Ryberg

So, these cookies where a major hit.  I'm sure it had something to do with the fact that they were dipped in minty chocolate, but I am now a believer in the single flour recipe.  It makes gluten-free  baking more accessible for people who want to try it out.  

Saturday, August 31, 2013

Pizza!

OK, let it just be said that we take our pizza extremely seriously around here.  In addition to being Italian and vegetarian (for almost as long), my husband and I manage a restaurant that is kind of famous for awesome pizza.  Pizza is one of those comfort foods that is unparalleled in its amazingness.  So when faced with the challenge of doing this gluten and dairy free, you might think impossible!  But never fear, we will get through this together.

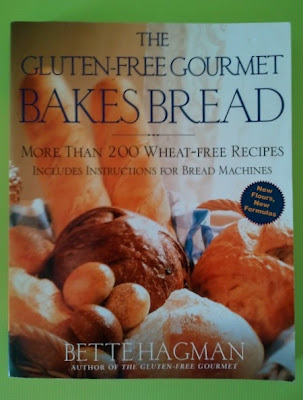
If you, or a member of your family is going gluten free, and you really love bread, you must go directly to your nearest book supplier/ amazon and pick up one of Bette Hagman's cookbooks.  She is amazing, and her flour mixes are so good that other cookbook author's use them as well.

We will begin with the flour mix. You can store the remainder of this mix in the cabinet, refrigeration not required.

Bette Hagman's french bread/ pizza flour mix:

(makes 6 cups)
3 1/2 Cups White rice flour
2 1/2 Cups Tapioca flour
2 Tbs. Xanthan gum
2 (7 gram) packets unflavored gelatin
2 Tbs. Egg replacer
1/4 Cup white sugar

Put all the ingredients in a plastic bag, and shake it up so its mixed up nicely.

Next comes the actual pizza!  (makes 1 crust)

Dry Ingredients
1 1/2 Cups French bread/Pizza mix
3 Tbs. almond meal
3/4 tsp. Italian seasoning
1/2 tsp salt
2 1/2 tsp Dry yeast granules

Wet Ingredients
2 egg whites
1 1/2 Tbs. Olive oil
1/2 tsp. Vinegar
3/4 Cup warm water

Preheat oven to 400 degrees F.  Lightly grease 1 cookie sheet.
Blend dry ingredients in a medium bowl, set aside.
Place wet ingredients in the bowl of your heavy duty mixer and blend, (reserve some of the water).  Turn the mixer on low and add the flour mix.  (Add the reserved water if the dough gets too firm, it will need to be spread onto the cookie sheet.)  Beat on high for 3 1/2 minutes.

Spoon the dough onto the prepared sheet, and spread into a circle 12 inches in diameter, using a spatula.

Let rise about 10 min then bake for 10 min (without toppings)
remove from oven and top with sauce, cheese, and you favorite toppings: bake for 22-25 min.

**For the cheese I use Daiya cheese.  It is dairy, gluten, and soy free.  It stretches, and melts, and oh ya, its also delicious!

recipe adapted from Bette Hagman's cookbook the Gluten-free gourmet Bakes Bread


The result is airy and crunchy, and pizza!  Nobody should be forced to live in a world without pizza, and now you don't have to.  I like to bake and extra crust, cool, and freeze.  Then whenever I want: thaw, top, and bake; for a super fast delicious week night dinner.

xo Dinah!


Monday, August 19, 2013

Be kind

Good morning friends,
This morning marks lots of new beginnings for lots of dear ones.  My sweet little guy begins his first day of kindergarten, and a very close friend of mine is welcoming a sweet baby girl into the world.
With new beginnings come new challenges to be sure.  New things can be exciting, but sometimes they can be a bit overwhelming as well.


Some people need more time to adjust to new things.  Some times you need some time to adjust to new things.  Here is my message for today: Be kind.  Be kind to others: you never know what someone is going through, be compassionate.  Be kind to yourself: the beginning can be difficult, but it will get easier.

Wishing everyone everywhere a lovely day.

xo Dinah!

Friday, August 16, 2013

Pickles!

Hello friends!  It is no secret that pickles are amazingly refreshing, delicious, and tangy.  But did you also know that they were incredibly easy to make, and that once you do, nearly impossible to go back to store bought pickles?


Ingredients:

3 Cups water
6 Tbs. white vinegar
3 Tbs. kosher salt
5 cloves Minced garlic
8-10 sprigs dills
2 lbs. Kirby cucumbers cut into spears
1/2 tsp. black peppercorns
1/2 tsp. red pepper flakes
1/2 tsp. mustard seeds
2 0r 3 glass jars with lids

Combine first 3 ingredients in a pitcher and stir well. Place several sprigs of dill in the bottom of each glass jar.  Pack jars with cucumber spears; pack as tightly as possible without squishing the spears.  

Top the cucumbers with minced garlic

Mix the peppercorns, mustard seeds, and red pepper flakes together, add the spice blend to the pickle jars. Give the water, salt, vinegar mixture another stir; then pour over the cucumbers.  Fill the jars up to the very top, put the lids on, and give them a good shake.  Now put them into the refrigerator for 3-7 days.  


Voila!  Trust me on this, these pickles will amaze you.  The simplicity, the crunchiness, they are delicious!  


P.S. I also make non-edible flying pickles, available in my ETSY shop. (:

xo Dinah!


Tuesday, August 13, 2013

World famous: Bean salad

Ok, so maybe this recipe isn't exactly "world famous" but anyone who has been to my house for dinner, especially during the summer, has probably eaten some of this protein packed, super simple, delicious salad.  This being the last week before school starts,  I thought it would be a great time to share some summer favorites.


After a hot day, lounging by the pool, or blowing bubbles in the park; everyone needs a recharge!  And over the years this has become one of my go to favorites. 


ingredients:

1 can kidney beans
1 can black beans
1 can garbanzo beans
4 cloves minced garlic
3 Tbs. lemon juice
7 Tbs. red wine vinegar
6 Tbs. olive oil
1 1/2 tsp. salt
generous amounts of black pepper (to taste)
1/2 lb. green beans 
2 stalks celery finely minced
optional: I like to top with either crumbled feta cheese or sliced hard boiled egg.

Combine oil, garlic, celery, lemon juice, vinegar, salt, and pepper in a large bowl.
Trim the green beans, and steam until tender, about 5-7 minutes.  Rinse under cold water & drain well.  
Open the cans of beans, drain and rinse well.  
Combine the green beans and canned beans,  in the large bowl (with the dressing in the bottom).  
Stir gently to combine.
Cover and let marinate for at least 2 hours.
Top with optional toppings (or not) and serve cold.


Enjoy!  

adapted from Moosewood Cookbook by Mollie Katzen

Sunday, August 11, 2013

Sunday dessert: French Apple Tart gluten & dairy free

Hello friends, another week has rolled by, and its time for something sweet for Sunday dessert.  My family always gets together on Sunday, and dessert is my department.  I love the challenge of experimenting with new recipes and trying to WOW everyone with my skills.


Baked Apple desserts selections have always been a favorite of mine.  They are inherently comforting, and, well, delicious.  


Ah yes, but we must start at the beginning, with {of course} the crust!


Flaky Pastry

1 C basic gluten free baking mix ( I used the Bob's Red Mill one)
2 Tbs. white rice flour
1 1/2 tsp sugar
1/4 tsp salt
6 Tbs. Earth balance (+ a little extra for buttering the pan)
1 Egg
1 Tbs. lemon juice

Put ingredients in the food processor in order listed, and pulse until the mixture holds together.  Remove from food processor, and form into a flat cake.  Cover and refrigerate if it is too soft to roll out.  
Roll out pastry between two sheets of parchment lightly dusted with rice flour.  Fit rolled out crust into buttered tart pan.  


French Apple Tart

1 recipe Flaky Pastry 
6 Granny Smith Apples, peeled, cored, and sliced into 1/4" slices
1 Tbs. Lemon juice
2 Tbs cognac (optional) 
1 Tbs. melted Earth Balance
1 Cup peach preserves, melted and strained
Vanilla So Delicious coconut ice cream

Preheat the oven to 375 degrees F.  Put the apple slices into a bowl.  Toss them with the lemon juice and the cognac.  Arrange the apple slices in concentric circles on the pastry, overlapping slightly.  Whisk the melted butter and any juices from the apples left in the bowl into the warm preserves.  At the start of baking, and every 10 minutes during the baking, brush the apples with the preserves mixture.  
Bake on the middle rack for 45 minutes or until the apples are brown and soft when pierced with the tip of a sharp paring knife.  Be careful not to over cook the apples.  Serve with a scoop of the Vanilla coconut ice cream. 

recipe adapted from Gluten-Free Baking by Rebecca Reilly


Tuesday, August 6, 2013

Peach Pie/ the Gluten free journey

OK, so here's the thing: everyone has to decide what is best for themselves and their families in regard to the type of food they eat.  And I usually don't talk about these extremely personal choices, because people might feel alienated, or that they are being judged, or that someone might get all preachy about what is best for everyone.  Just to be clear: none of that is happening here.
Now that my disclaimer is out of the way, I have decided that what is best for my kid is a Gluten Free, Dairy free diet.  When I first made this decision I was in a panic that one of my favorite things to do (baking) was clearly off limits.  I tried just about every Gluten free baking mix on the market, with mediocre results.  Mediocre baked goods are just unacceptable to me!  I have the philosophy that everything I eat should be delicious- that's not asking too much, is it?


I wasn't giving up.  I love baking for my son, and I also love a challenge.  So I bought a few cookbooks  on the topic, and got to work.  One of my favorites is Gluten-Free Baking by Rebecca Reilly.  The recipe for this pie is in there.  


And friends, it is peach season!  


ta-Da!  The taste testers have confirmed its deliciousness.  

Peach Pie

ingredients :
1 1/4 Cups apricot nectar
1/2 Cups peach preserves
2/3 Cup packed brown sugar
3 Tbs. cornstarch
1/4 tsp. cinnamon
1/8 tsp. ginger
8 ripe peaches, peeled, pitted, and sliced
2 Tbs. orange juice
1 double-crust recipe Flaky Pastry
egg glaze (1 egg yolk mixed with 2 Tbs. coconut milk)

Preheat the oven to 400 degrees F, and butter (I use earth balance for this) an 8" pie plate.
heat the nectar in a small non aluminum saucepan.  Bring to a boil and simmer for 30 minutes or until reduced to 3/4 cup.  Add the preserves and whisk to combine.  strain and cool.  

Mix together the brown sugar, cornstarch, cinnamon, and ginger.  Place the sliced peaches in a bowl.  Toss with the orange juice and sugar mixture.  Set aside.  

Roll out a top and bottom crust, using 2 pieces of lightly rice-floured parchment paper.  Fit one crust into the buttered pie plate.  Brush the crust with the cooled preserves glaze.  Carefully spoon in the peaches and any juices.  Cover with Lattice strips cut from the second rolled out crust.  Crimp the edges to form a decorative border.  Brush top with the egg glaze.

Bake on the bottom rack for 15 minutes.  Transfer the pie to the middle rack and lower the oven temperature to 350 degrees F, and bake for another 25 minutes.  Serve warm.

adapted from Gluten-Free Baking by Rebecca Reilly


Friday, August 2, 2013

finding my way

I've been feeling a little down about all the drudgery that seems to accompany adult life these days.  I never thought that daydreaming in my studio space in college would eventually lead me to the most unartistic career possible.  And yet, here I am- accounts payable/ receivable.  And I do feel that in this current economic climate I should feel blessed to have gainful employment, and I do... but something is most definitely missing.  Being a person that doesn't like to be told what to do, the path to being "successful" seems somewhat undefinable.


Something I have learned (and keep reminding myself of) is that anything is possible.  What is needed to make the anything happen is determination, and once you find that- there is no stopping you.


"In the end, only three things matter: how much you loved, how gently you lived, and how gracefully you let go of things not meant for you." -Buddha

Sunday, January 20, 2013

A few words about fathers

Although not a deeply religious person, I celebrate a day of rest and thankfulness on Sundays.
My Dad's birthday was on Friday, and that got me to thinking about how thankful I am for all the wonderful dads I know.


My Dad is unwavering in his support for his family, and an incredible Mr. fix-it.  Really, the kind of awesomeness dads everywhere should aspire to.   And even though I didn't get to pick him out myself, I would have, given the choice. 


My husband is also an amazing Dad.  It warms my heart to watch him with Seven.  He is patient, understanding, and always up for adventure.  

Thanks to great dads everywhere.

Wednesday, January 2, 2013

A Trip to Knaus Berry Farm

I love the feeling of a fresh start.  The feeling that anything is possible, and wonderful things can happen.  With the new year freshly in place, I was really feeling that today.

Today was a lovely Florida winter day.  It was 75, sunny, but not hot.  Perfect for the Berry farm.


 The milkshakes are absolutely dreamy.  A well deserved reward for picking berries.


Checking out the farm


Seven found a bunch of beauties to add to our basket too.


Our basket full to the brim


Getting ready to jam.

Small batch Strawberry Jam
2 Pint Strawberries
1 Cup of sugar
2 Tbs. lemon juice
1/2 Tbs. of ginger

1. In a 12 inch Skillet bring the fruit, sugar, ginger, and lemon to a boil; over medium high heat, stirring occasionally.
2. Reduce heat to medium and cook stirring constantly for about 20 min. At this point I also mashed everything up, a few times using a potato masher.  Be careful: the jam is really hot!  
3. Cook until mixture begins to look syrupy and thickens slightly.  Put in jars and cool to room temp before serving, or refrigerate. 


right after the beginning boil


after mashing


ready to eat!

Thanks to Aunt Tracy for sharing your recipe. (: